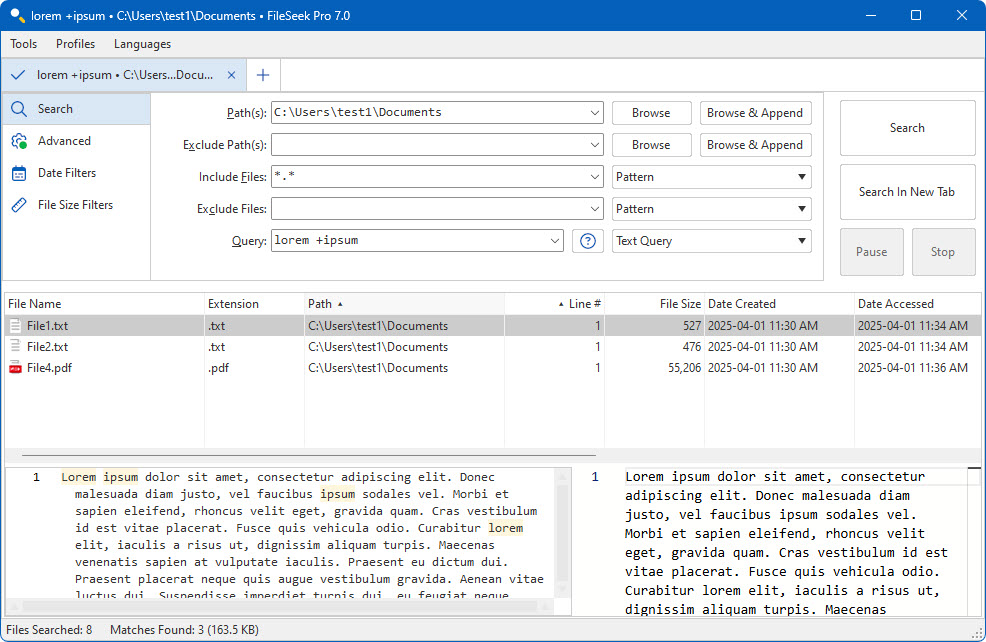
This is the main window of FileSeek. It contains all of the controls that you need to search for virtually anything on your computer or network.
- Search: This button stops the current search and restarts it with your new search criteria.
- Search in New Tab: This button lets you start a new search in a new search tab. (Pro Only)
- Pause: This button will pause your search.
- Resume: This button is only active during a paused search. Clicking this button will resume a paused search.
- Stop: This button stops the current running search, and is enabled only when a search is running in the current search tab.
- Matches Found: This text will show how many matches were found in the search.
- Files Searched: This text will show how many files have been searched.
This tab contains all of the fields and options for performing basic searches.
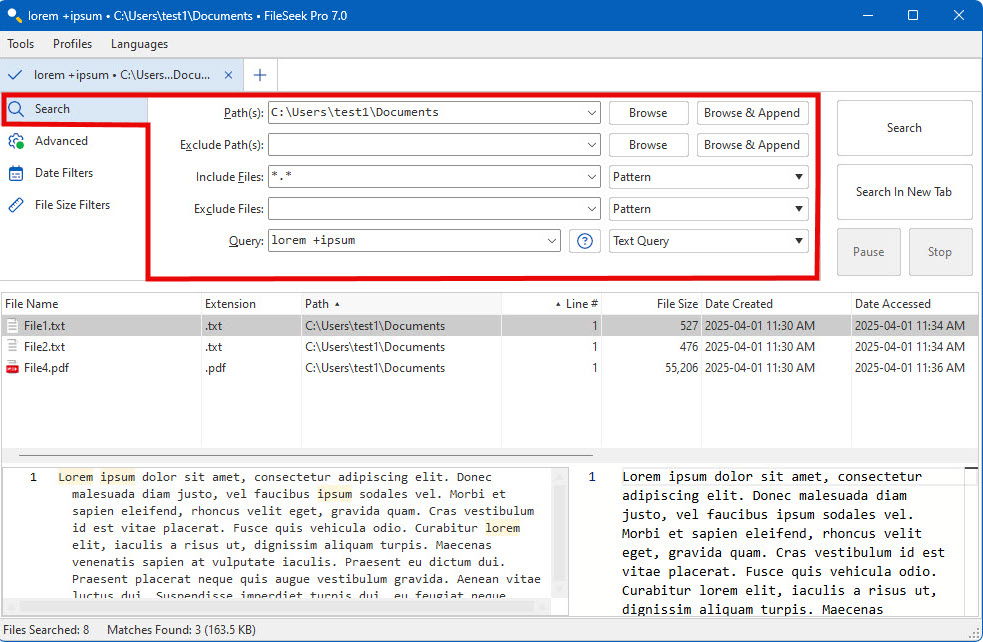
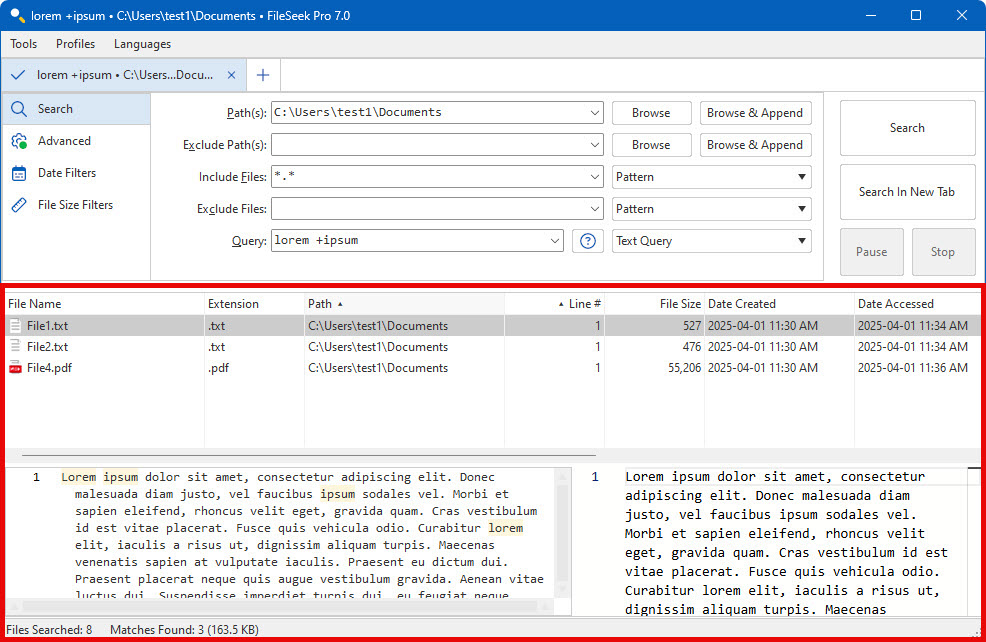
- Path(s): This is a user defined list of paths that will be searched. To have multiple entries, separate each item with a '|' character.
- Browse and Append: This button opens a dialog window to allow you to select a path that you would like to add to your search path list.
- Exclude Path(s): This is a user defined list of paths that will be excluded from your search. To have multiple entries, separate each item with a '|' character.
- Browse: This button opens a dialog window to allow you to select a path that you would like to exclude from your search.
- Include Files: This is a user defined list of files that will be included in your search. To have multiple entries, separate each item with a '|' character.
- Pattern: Uses a pattern to match.
- RegEx: Uses regular expressions to match (regex).
- Text Query: Uses our powerful Text Query syntax to match.
- Exclude Files: This is a user defined list of files that will be excluded from your search. To have multiple entries, separate each item with a '|' character.
- Pattern: Uses a pattern to match.
- RegEx: Uses regular expressions to match (regex).
- Text Query: Uses our powerful Text Query syntax to match.
- Query: Allows you to specify the text that you would like to search for within the files that match the Include Files filter.
- RegEx: Uses regular expressions to match (regex).
- Text Query: Uses our powerful Text Query syntax to match.
- Exact Match: Uses an exact string to match.
This is the Advanced Options tab of FileSeek. From here you can select different options that change the way a search behaves.
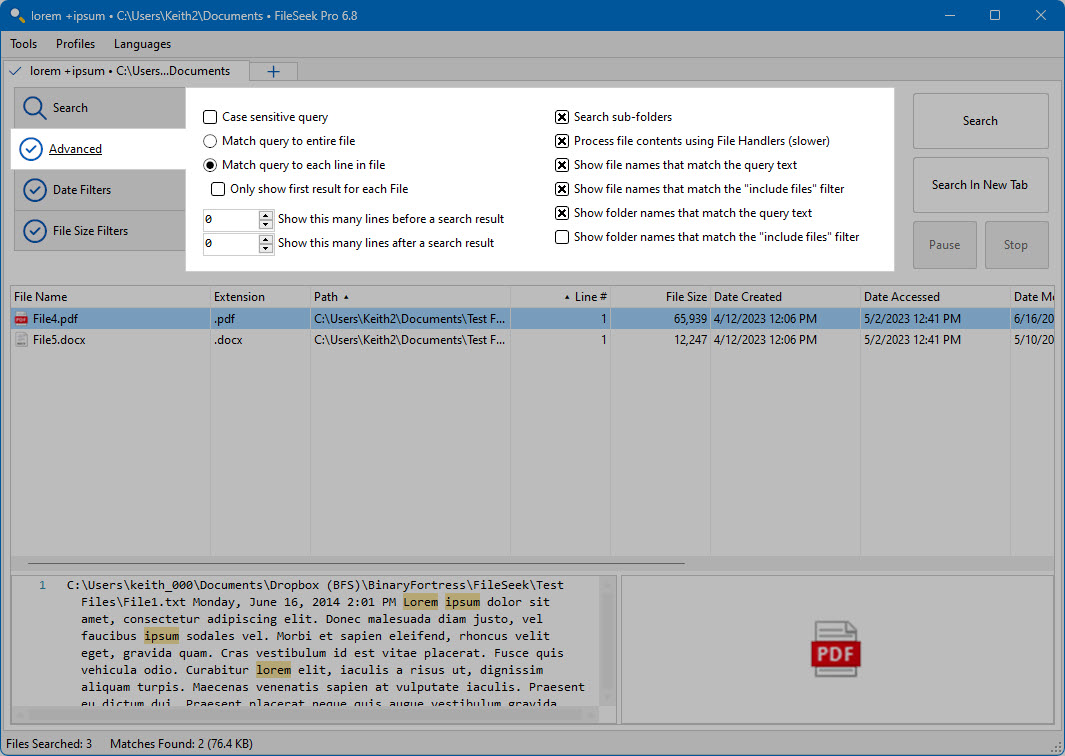
- Case sensitive query: This option makes FileSeek ignore file contents that have different upper and lower case letters than your query.
- Match query to entire file: This radio button will make FileSeek open an entire file at once and try to match it to the query. A result will only be added if the entire text in the file matches the query.
- Match query to each line in file: This radio button will make FileSeek open a file and try to match each line to the query. Each matched line will be added to the search results.
- Only show first result for each file: When matching a query to each line in a file, this option will make FileSeek move to the next file to be searched after it has found and displayed the first result matching the query in the current file. This option is
disabled when matching a query to an entire file, since matching a query
to an entire file will only ever have one result.
- Show this many lines before a search result: When this option is enabled the text field which shows the search result on the main frame will try to show the specified number of lines before the actual match in the file.
- Show this many lines after a search result: When this option is enabled the text field which shows the search result on the main frame will try to show the specified number of lines after the actual match in the file.
- Search sub-folders: This option enables FileSeek to search within the child folders in your search paths. If this option is enabled on a folder with many subfolders, with many files in them, the search time could be greatly increased.
- Process file contents using File Handlers (slower): Enabling this option will tell FileSeek to open files with the file handler that your operating system has assigned to it, to search properly through files that do not contain plain text.
- Show file names that match the query text: If this option is enabled FileSeek will also search for files whose names matched the query text.
- Show file names that match the "include files" filter: If this option is enabled FileSeek will show file names that match the "include files" filter.
- Show folder names that match the query text: If this option is enabled FileSeek will also search for folders whose names matched the query text.
- Show folder names that match the "include files" filter: If this option is enabled FileSeek will show folder names that match the "include files" filter.
This tab allows you to filter your search results by date and time.
- Date Created: This search filter will refine your search based on when a file was created.
- Date Accessed: This search filter will refine your search based on when a file was accessed.
- Date Modified: This search filter will refine your search based on when a file was modified.
- Date Filter Logic: Choose between AND and OR logic for the date filters.
- AND: All of the date filter requirements will need to be met to get a match on a file.
- OR: Only one of the date filter requirements will need to be met to get a match on a file.
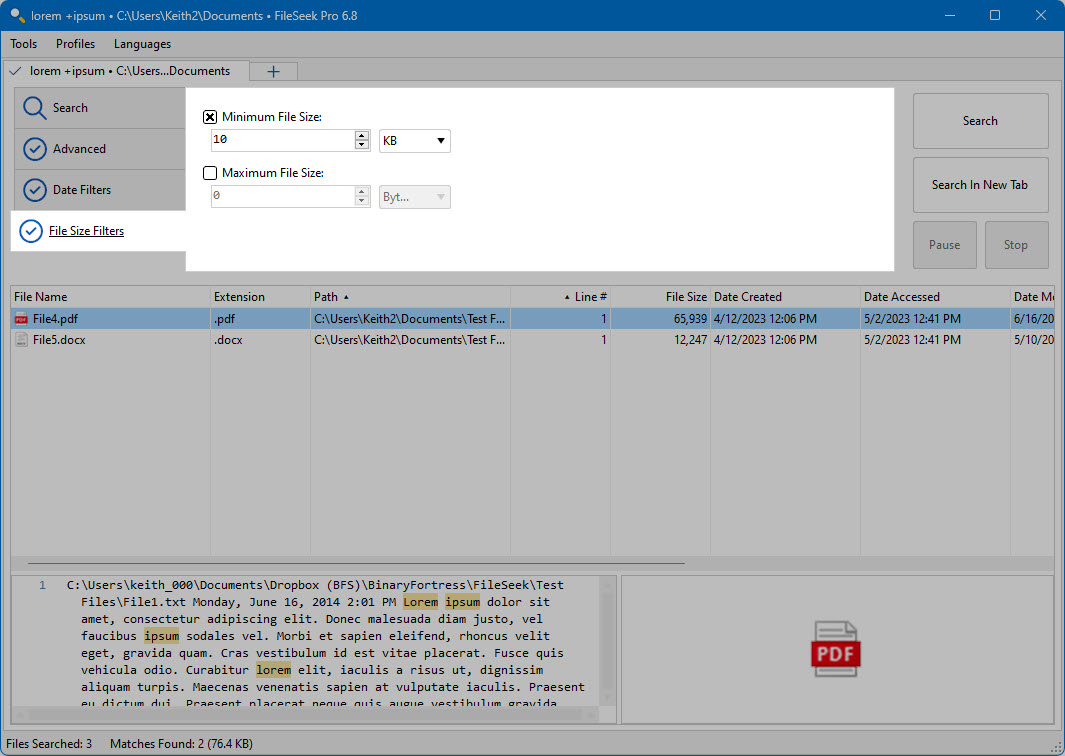
This tab allows you to filter your search results by file size.
- Minimum File Size: With this option enabled, FileSeek will only search for files that are greater than the indicated file size.
- Maximum File Size: With this option enabled, FileSeek will only search for files that are less than the indicated file size.
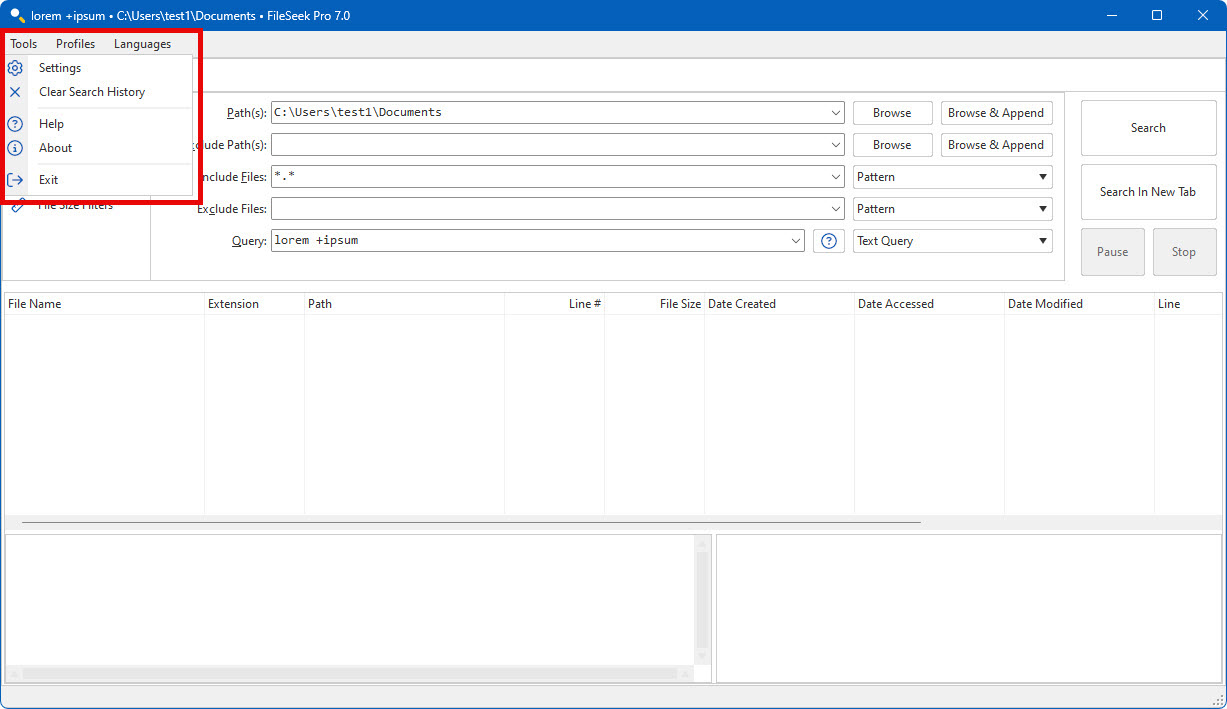
The Tools menu provides access to the Settings window, Online Help, About page, and to exit FileSeek.
- Settings: Opens the FileSeek Settings window.
- Clear Search History: Clears the previously used search values.
- Help: Opens the online help page for FileSeek in your default browser.
- About: Opens the About page with information about the developers of FileSeek.
- Exit: This menu option will close FileSeek.
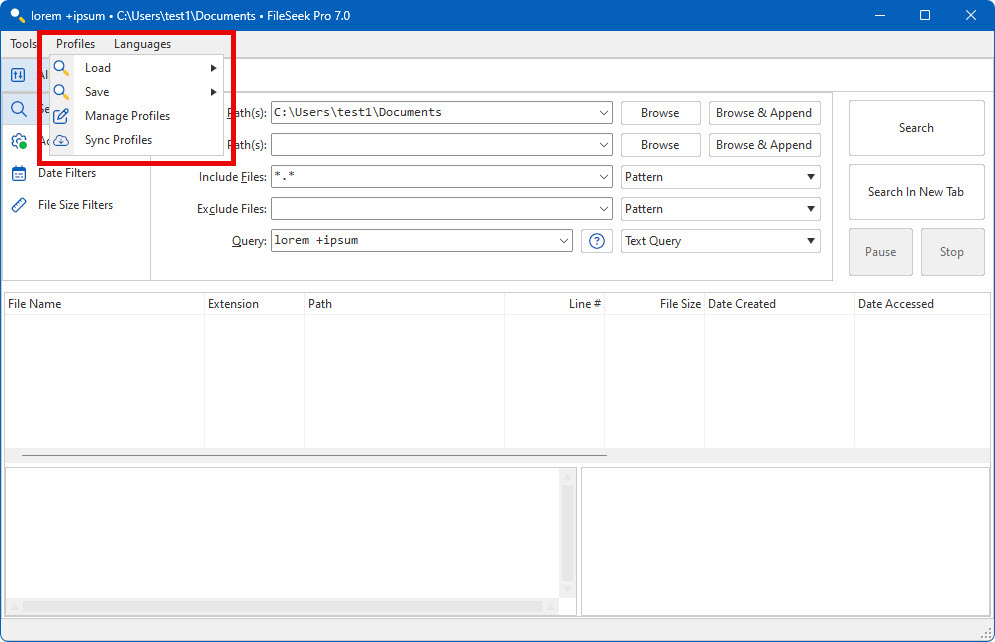
The Profiles menu contains options to save, load, modify, and sync the profiles saved on your computer. (Pro Only)
- Load: This menu option contains a list of profiles that are saved on the computer. (Pro Only)
- Save: This menu allows you to save the current search tab as a new profile, or overwrite an existing profile with the current search tab.
- Manage Profiles: This menu option opens a dialog where you can perform various tasks on the profiles saved to your computer. (Pro Only)
- Sync Profiles: This menu option connects to your Binary Fortress account to sync your profiles with the Binary Fortress servers. (Pro Only)
- Save New Profile: This menu option allows you to save your current search criteria as a FileSeek Search Profile. (Pro Only)
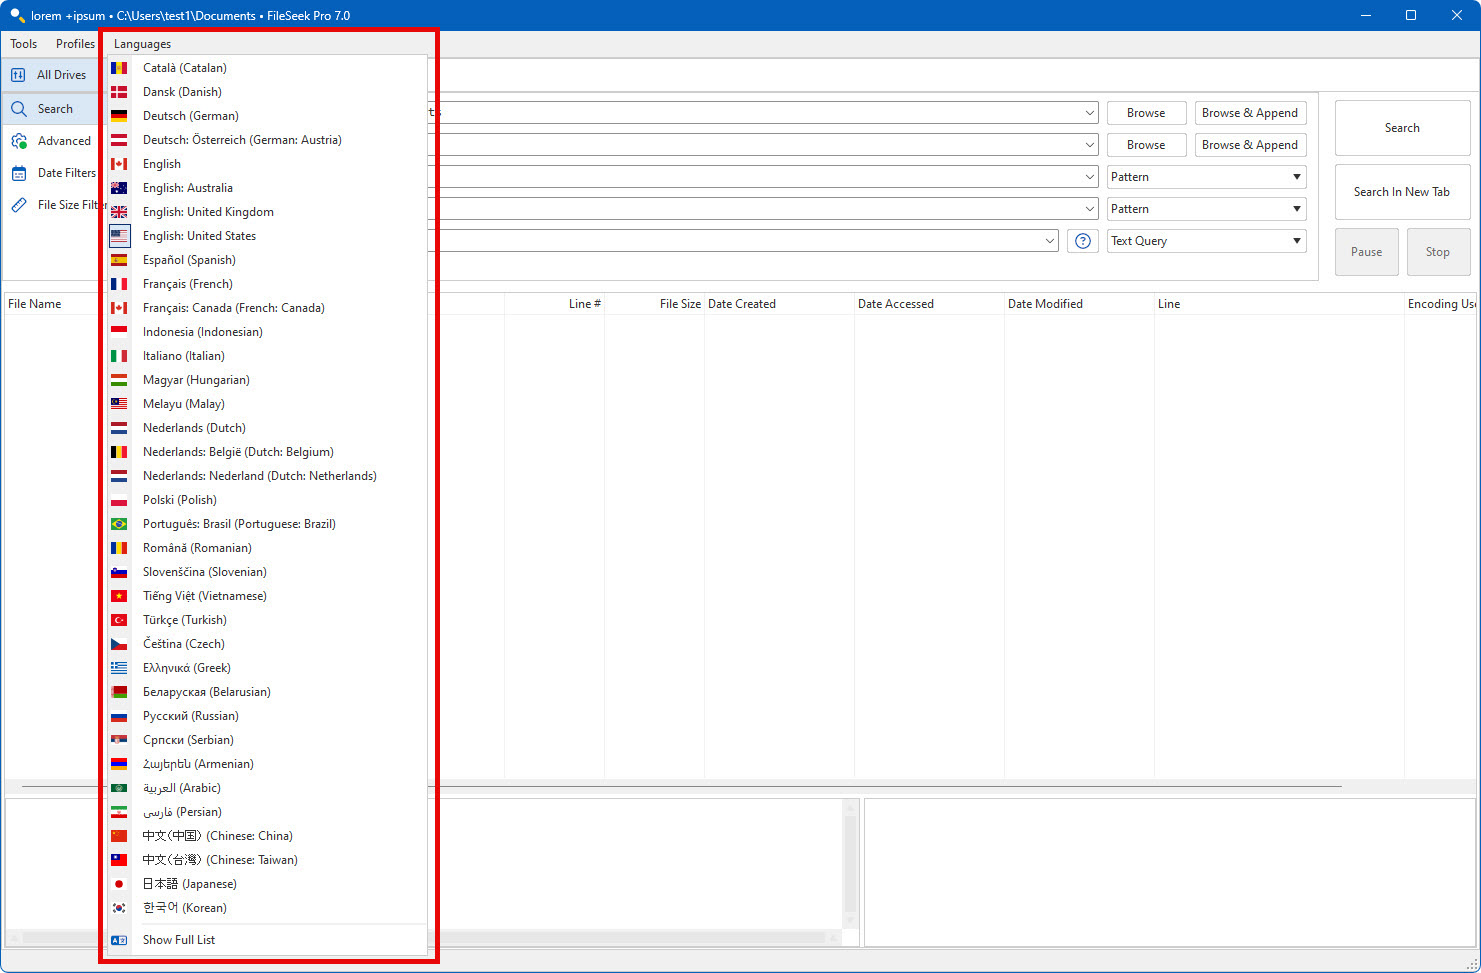
The Languages menu shows you what languages are currently installed in FileSeek, and allows you to easily switch between them at any time.
- Show Full List: This menu option opens the FileSeek Settings window to the Languages tab, where all of the languages, and other information about them will be shown.
The Search Results pane contains all of your running or completed searches.
- File Name: This column shows the file or folder name of a search result, and its icon.
- Extension: This column shows the file extension of the search result.
- Path: This column shows the full path to the search result.
- Line #: This column shows the line number of the line that matched the query text. Note: The line number will only be shown when using the "Match query to each line in file" option on the Advanced tab.
- File Size: This column shows the size of a file in bytes.
- Date Accessed: This column shows information on when the file or folder was last accessed.
- Date Modified: This column shows information on when the file or folder was last modified.
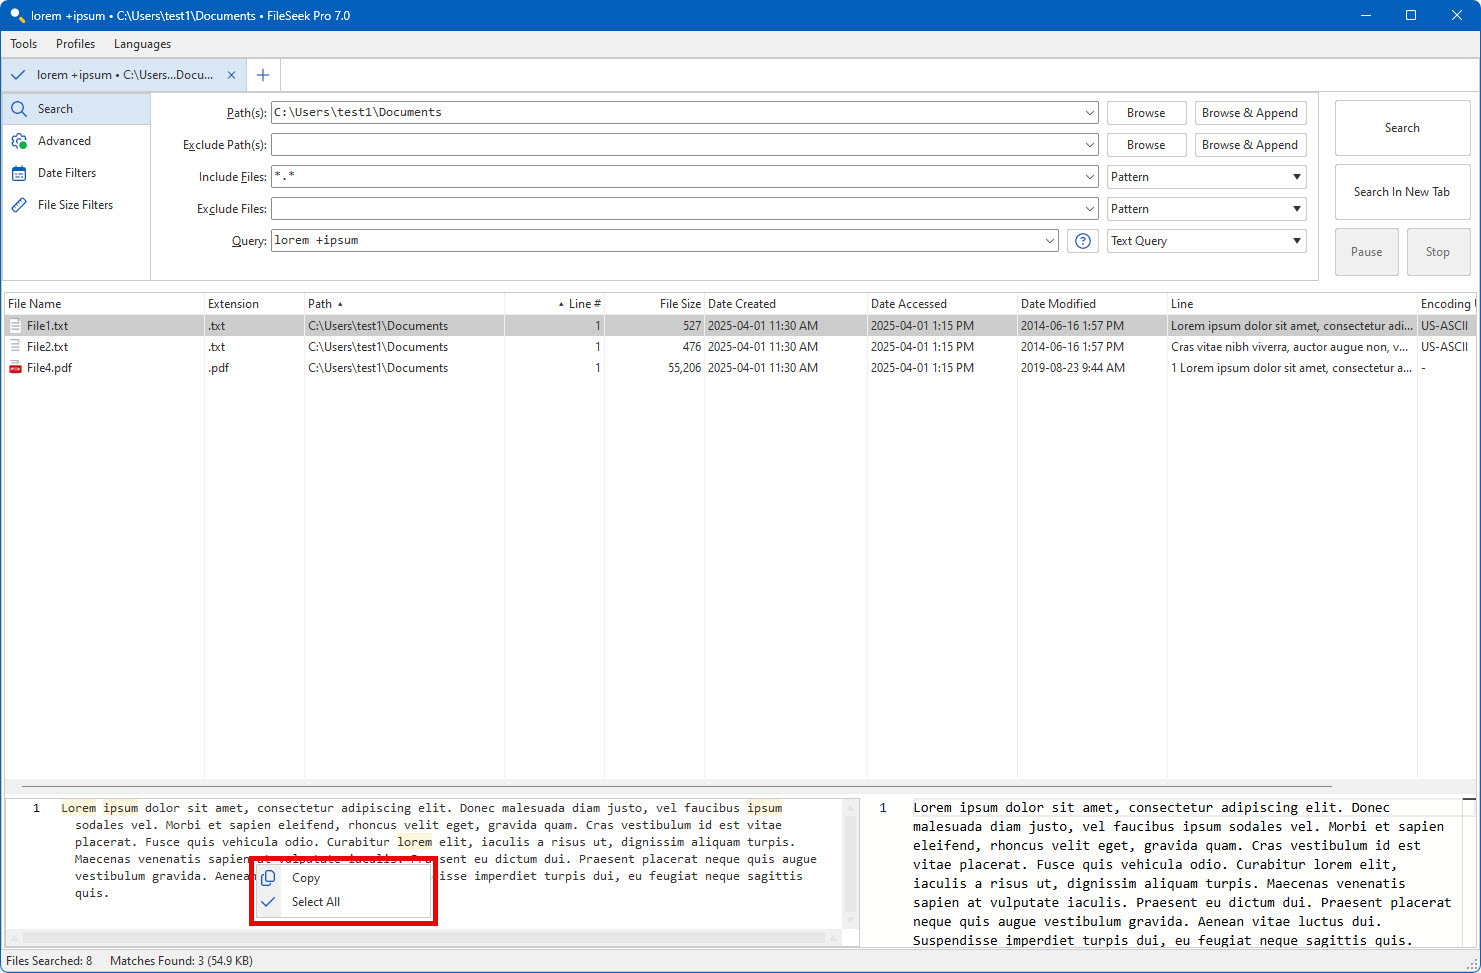
- Line: This column shows the reason why a file or folder was added to the search results.
- Encoding Used: This column shows the text encoding type that was used to search the contents of the search result.
This is the context menu that is shown when you right-click on a search result. The contents of this menu may vary slightly based on the selected search result.
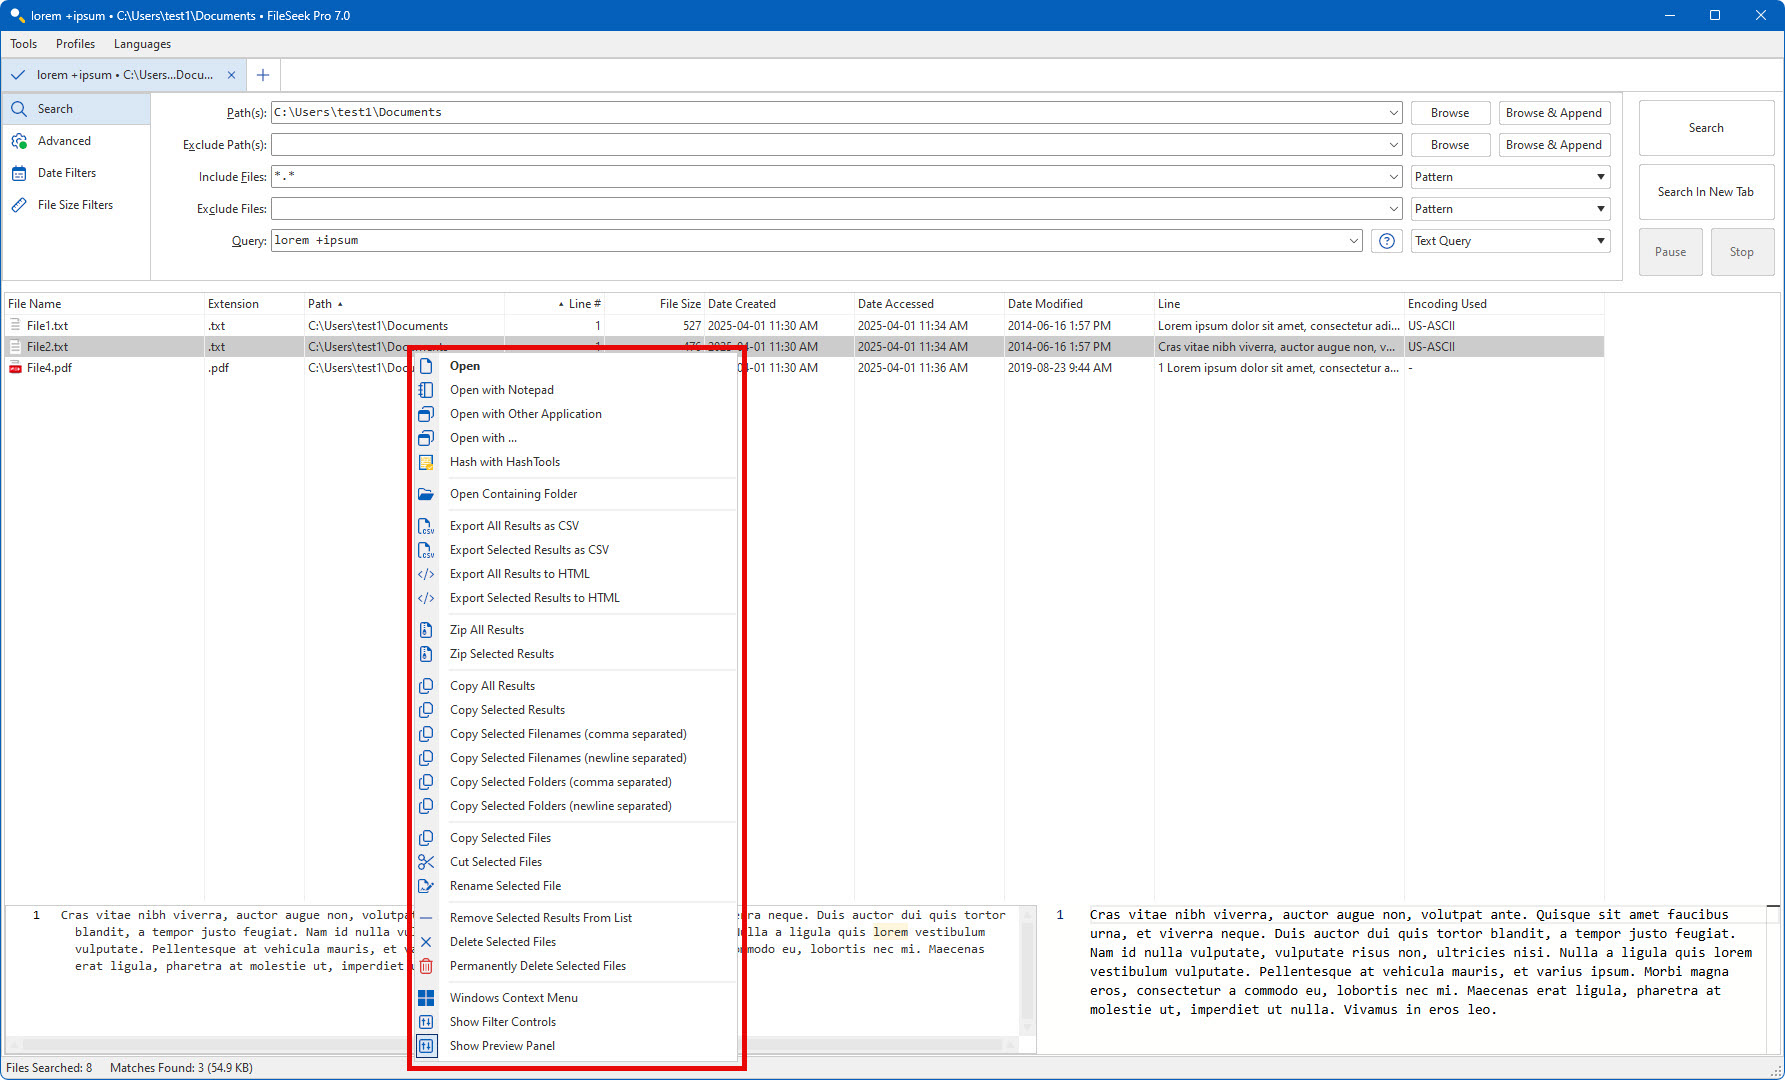
- Open: This menu option will open a file in the search results with the default Windows file handler.
- Open with Notepad: This menu option will open a file in the search results with Notepad.
- Open with: This menu option will open a file in the search results with a program that you have chosen. If no application has been selected, a prompt will be shown to ask the you to choose one.
- Hash with HashTools: This menu option will open HashTools with the selected files added. If you don't have HashTools installed, it will open the HashTools download page in your default web browser.
- Open Folder: This menu option will open a folder in the search results.
- Open Containing Folder: This menu option will open the containing folder of a file in the search results in Windows Explorer.
- Export All Results as CSV: This menu option will export all search results as a spreadsheet file. A save file dialog will open asking you to select a save path, and a file name for the results. (Pro Only)
- Export Selected Results as CSV: This menu option will export the selected search results as a spreadsheet file. A save file dialog will open asking you to select a save path, and a file name for the results. (Pro Only)
- Export All Results to HTML: This menu option will export all search results as a web page. A save file dialog will open asking you to select a save path, and a file name for the results. (Pro Only)
- Export Selected Results to HTML: This menu option will export the selected search results as a web page. A save file dialog will open asking you to select a save path, and a file name for the results. (Pro Only)
- Zip All Results: This menu option will add all of the results to a zip file.
- Zip Selected Results: The menu option will add only the selected results to a zip file.
- Copy All Results: This menu option will copy all of the search result information to the clipboard.
- Copy Selected Results: This menu option will copy the selected search result information to the clipboard.
- Copy Selected Filenames (comma separated): This menu option will copy all of the filenames for the selected files and folders in the search results with each result separated by a comma.
- Copy Selected Filenames (newline separated): This menu option will copy all of the filenames for the selected files and folders in the search results, with each result on a new line.
- Copy Selected Files: This menu option will copy all of the selected files or folders to the clipboard.
- Cut Selected Files: This menu option will cut all of the selected files or folders to the clipboard.
- Rename Selected File: This option will let you rename a selected file or folder.
- Remove Selected Results From List: This context menu option will remove the selected items from the search result list, but not remove them from your computer.
- Delete Selected Files: This menu option will delete all of the selected files or folders from your computer.
- Permanently Delete Selected Files: This menu option will permanently delete all of the selected files or folders from your computer. Files deleted using this option can not be recovered using the recycle bin.
- Windows Context Menu: This menu option will open the regular Windows Explorer context menu for the selected search result.
- Show Filter Controls: When this menu item is selected, the search filter control visibility will be toggled. The search filter controls are hidden by default in a new search.
- Show Preview Panel: This menu option allows you to show or hide the preview panel.
This is the context menu that shows when you right-click on a search tab.
- Close: This menu option will close the search tab that you right-clicked on.
- Close All: This menu option will close all of the search tabs.
- Close All But This: This menu option will close all of the search tabs except the tab that you right-clicked on.
This is the context menu that shows when you right-click on the text field that shows the information about the search result, or the line in the file.
- Copy: Copies the selected text from the line preview pane.
- Select All: This menu option will select all of the text in the result line text field.
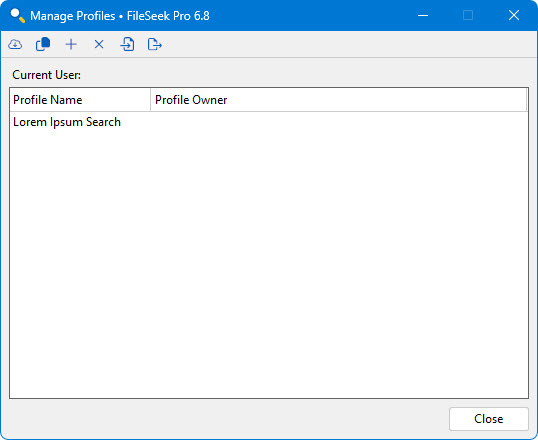
This window allows you to modify, copy, or delete FileSeek Search Profiles. (Pro Only)
- Profile Name: This column shows the name of a profile.
- Profile Owner: This column show the owner of a profile.
- Current User: This text shows the name of the user that is currently logged in.
- Sync with your Binary Fortress Account: This button connects FileSeek to your Binary Fortress account to sync your search profiles.
- Copy Profile: This button lets you copy or duplicate the selected search profile.
- Rename: This button allows you to rename the selected profile.
- Delete: This button lets you delete a profile from your computer. If you're logged into your Binary Fortress account and you own the profile that you're deleting, it will also be deleted from the servers.
- Import Profile: This button allows you to import a search profile from a file.
- Export Profile: This button allows you to export the selected search profile. You can then copy it to another computer and import it.
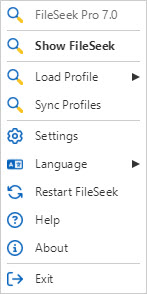
The FileSeek tray icon and menu are available when either the minimize to system tray, or close to system tray are enabled.
- Show FileSeek: This menu button will show FileSeek
- Load Profile: This menu shows all of the current user's profiles. Clicking on a profile will open FileSeek with the selected profile
- Sync Profiles: Initiates a sync of your search profiles.
- Settings: This menu item opens the settings window.
- Language: This menu item allows you to change the user interface language for FileSeek.
- Help: This menu item opens the FileSeek online help in your default browser.
- About: This menu item opens the About tab in the settings window for information on Binary Fortress Software.
- Exit: This menu item exits FileSeek.
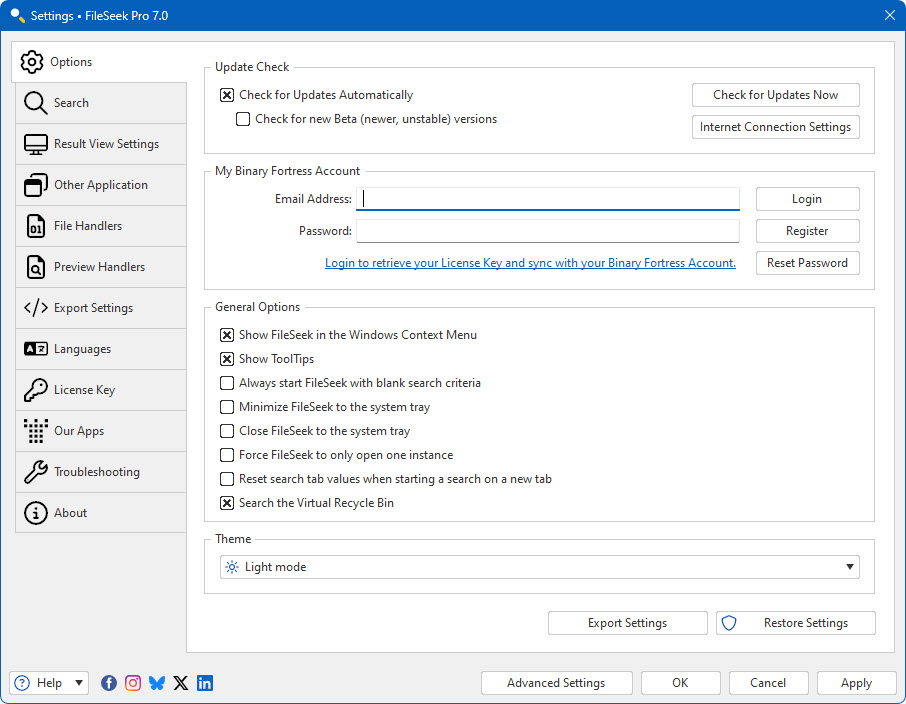
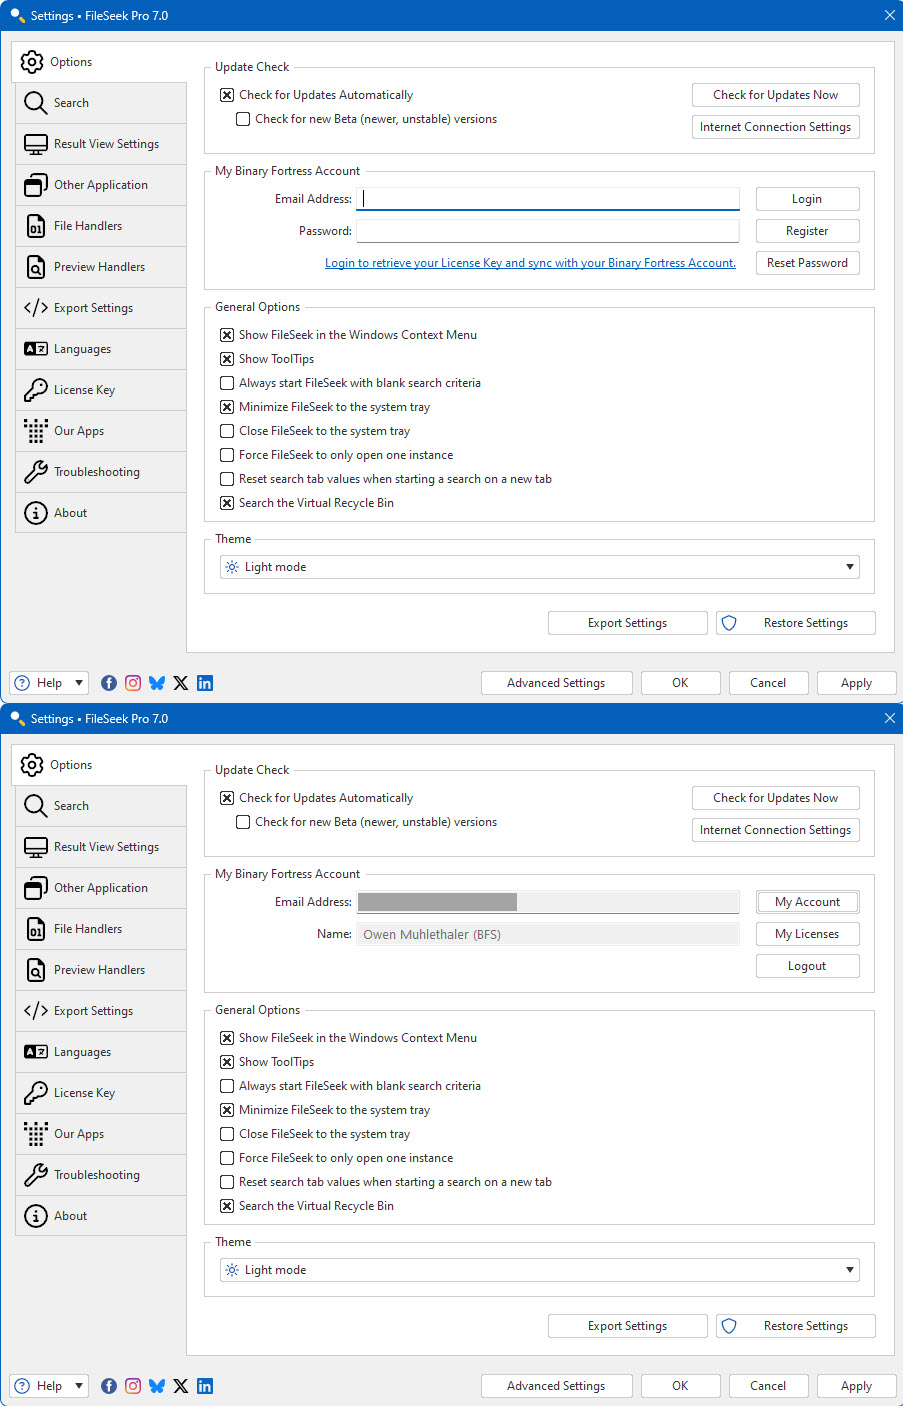
The Settings window allows you to customize FileSeek, login to your Binary Fortress account, and much more.
This tab in the Settings window allows you to log onto your Binary Fortress account, check for program updates, and modify application settings.

- Check for Updates Automatically: Enable this to let this application periodically check for updates.
- Check for new Beta (newer, unstable) versions: Enable this to let this application check for new Beta versions. This setting is not recommended unless you are interested in testing new software.
- Check for Updates Now: Perform an update check right now.
- Internet Connection Settings: Click this button to open the proxy settings window.
- Show FileSeek in the Windows Context Menu: When this option is enabled, an option to search files and folders will be included in the default Windows Explorer context menu.
- Show ToolTips: This option either enables or disables ToolTips in FileSeek.
- Always start FileSeek with blank search criteria: When this option is enabled, FileSeek will always start with blank search parameters and the default search options.
- Minimize FileSeek to the system tray: With this option enabled, FileSeek will minimize into the system tray instead of the taskbar
- Close FileSeek to the system tray: With this option enabled, FileSeek will stay in the system tray when it is closed.
- Force FileSeek to only open one instance: When this option is enabled, FileSeek will keep all searches in the same instance.
- Reset search tab values when starting a search on a new tab: Enable this option to have FileSeek clear all of the search parameters when opening a new search tab. Disable this option to have FileSeek duplicate the search parameters from the current tab when opening a new search tab.
- Search the Virtual Recycle Bin: Enable this option to have FileSeek search the Windows Recycle Bin.
- Export Settings: Click this button to export your current application settings to a .REG file. You can use this backup file to import your settings to another machine, or use it to restore your settings if you are re-installing your machine.
- Restore Settings: Allows you to restore your settings from a previously created backup.
- Advanced Settings: Click this button to open the Advanced Settings window.
In the "My Binary Fortress Account" section, you can enter your email address and password to enable easy retrieval of your license key.
- Email Address: Enter the email address for your Binary Fortress Account here.
- Password: Enter the password for your Binary Fortress Account here.
- Login: Enter your email address and password, then click this button to login to your Binary Fortress Account. Once logged in, you can retrieve your license key if needed.
- Register: If you don't already have a Binary Fortress Account, click this button to open the registration page.
- Reset Password: If you've forgotten your password, click this button to open the password reset page.
- Name: When logged in, the name on your account shows here.
- My Account: Click this button to access your account page on the our website.
- My Licenses: Click this button to view and apply your license key.
- Logout: Click this button to logout of your Binary Fortress Account. No items will be synced while logged out.
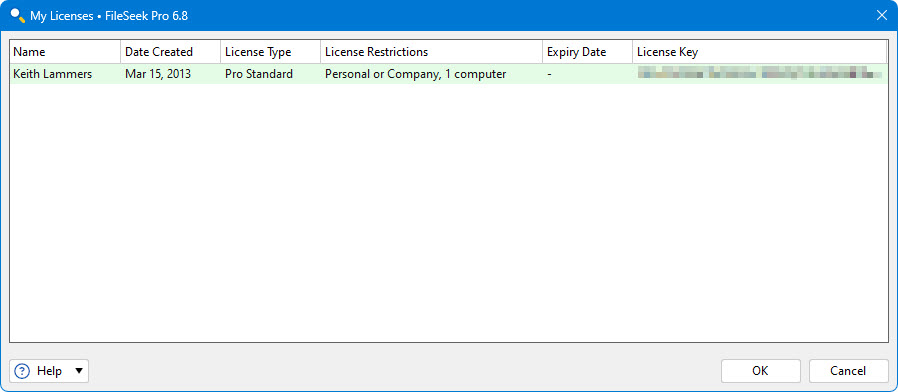
The My Licenses dialog allows you to view and load any license keys that are applicable for this product. If you don't see your purchased license listed, please contact us and we'll help track it down. This dialog can be accessed via the My Licenses button on the Settings > Options tab (when logged in).
- Name: This column displays the name of the user associated with the license.
- Date Created: This column lists the date that each of your licenses was created.
- License Type: This column lists the license type for each of your licenses.
- License Restrictions: This column explains the restrictions for the license type of each of your licenses.
- Expiry Date: This column lists the expiry date (if applicable) for each of your licenses.
- License Key: This column displays the license key.
This tab in the Settings window contains options that you can change to personalize your search.
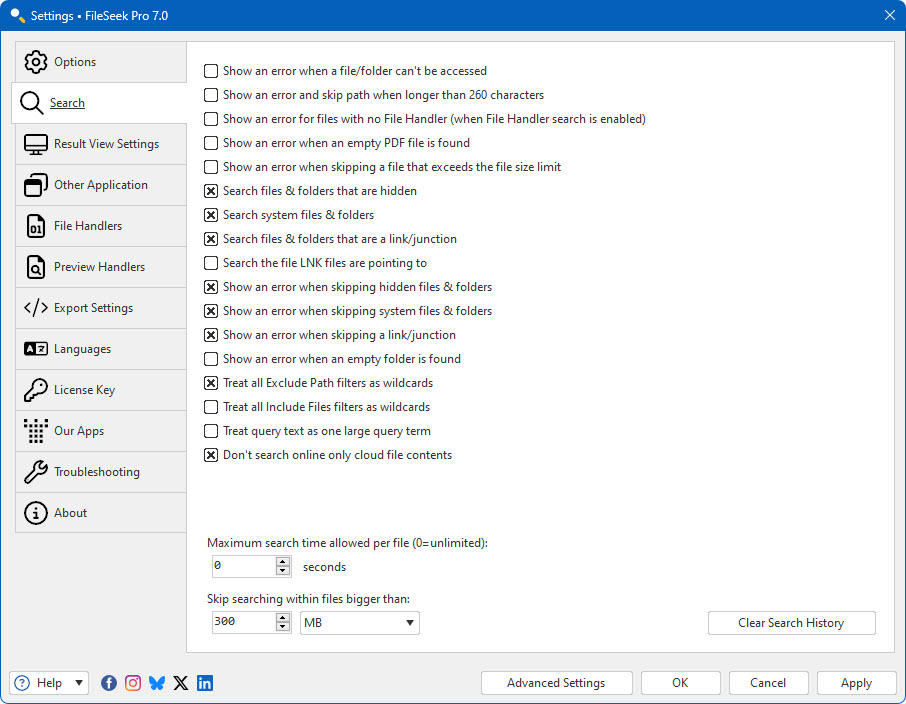
- Show an error when a file/folder can't be accessed: If this option is enabled, and FileSeek has trouble opening a file or folder, an error message will be added to the search results.
- Show an error and skip path when longer than 260 characters: When this option is selected, FileSeek will show an error in the result list when a file or folder's path exceeds 260 characters. When this option is enabled FileSeek will not search any files or folders contained within the long directory.
- Show an error for files with no File Handler (when File Handler search is enabled): When both this option and searching with file handlers are enabled and no file handler is found for the current file being searched, FileSeek will add a result to the search results showing the error.
- Show an error when an empty PDF file is found: If this option is selected and FileSeek finds an empty PDF file, an error will be added to the search results.
- Show an error when skipping a file that exceeds the file size limit: If this option is enabled, FileSeek will show an error in the search results for files that it skipped because they were too large.
- Search files and folders that are hidden: If this option is enabled FileSeek will include hidden files and folders in the search results.
- Search system files and folders: If this option is enabled FileSeek will include system files and folders in the search results.
- Search files and folders that are a link/junction: When this option is enabled, FileSeek will try to search through file and folders that are a link or junction.
- Search the file LNK files are pointing to: If this option is enabled, FileSeek will search the contents of the target file instead of the .lnk file for any shortcuts that are in the directory being searched.
- Show an error when skipping hidden files and folders: If FileSeek cannot open a file or folder because it is hidden and this option is enabled, an error message will be added to the search results.
- Show an error when skipping system files and folders: If FileSeek cannot open a file or folder because it is a system file or folder and this option is enabled, an error message will be added to the search results.
- Show an error when skipping a link/junction: If FileSeek cannot open a file or folder because it is a link or junction and this option is enabled, an error message will be added to the search results.
- Show an error when an empty folder is found: If this option is enabled, FileSeek will show an error message in the search results.
- Treat all Exclude Path filters as wildcards: When this option is enabled, anything written in the exclude paths filter will be treated as a wildcard, meaning that as long as what is typed matches some part of the path, that path will be excluded from the search.
- Treat all Include Files filters as wildcards: When this option is enabled, anything written in the include files filter will be treated as a wildcard, meaning that as long as what is typed matches some part of the file name, that file will be included in the search.
- Treat query text as one large query term: If this option is enabled, FileSeek will search for the exact text in the query text field within files being searched.
- Don't search online only cloud file contents: Enabling this option will force FileSeek to skip searching contents of OneDrive or Dropbox files that have not been downloaded for offline use. This prevents FileSeek from triggering a download of those files when it tries to open it to search their contents.
- Maximum search time allowed per file (0=unlimited): Use this option to set a maximum amount of time FileSeek will spend on searching a file before skipping it.
- Skip searching within files bigger than: This forces FileSeek to not search within the contents of files that are larger than the size specified in this setting. This is helpful in avoiding long delays for files that are not really searchable, like ISO files, video files, etc.
- Clear Search History: Click this button to clear the history for all search parameters.
This tab in the Settings window contains options that change the way your results are presented.
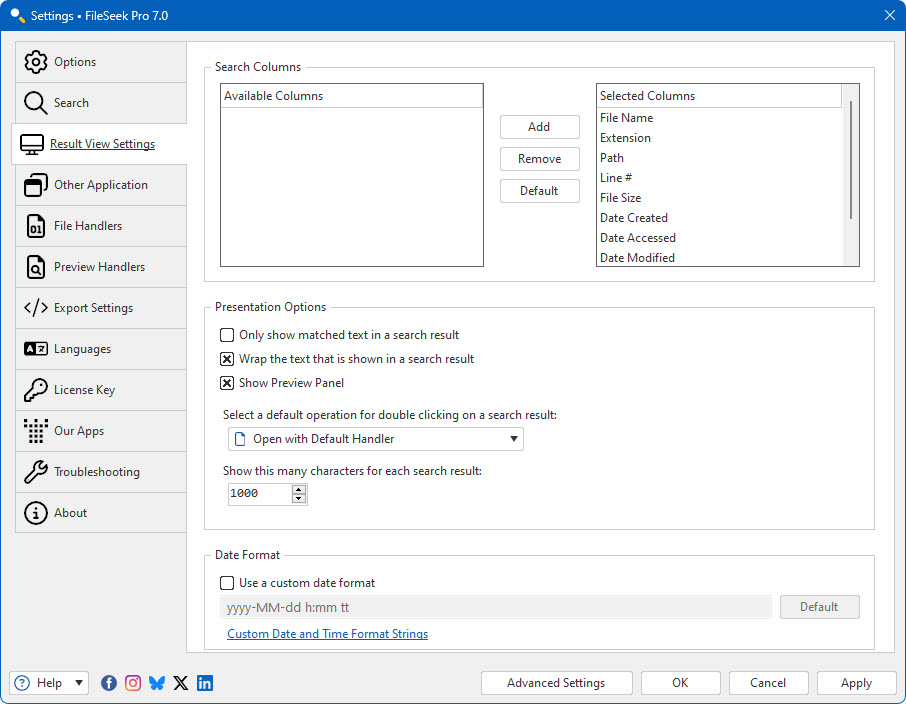
- Add: Click this button to add the selected column to the results view.
- Default: Click this button to reset the results view columns to defaults.
- Remove: Click this button to remove the selected column from the results view.
- Available Columns: This list shows the available columns that can be shown in the Result List.
- Selected Columns: This list shows the columns that are currently shown in the Results List. To reorder the columns, you can drag and drop the items in this list.
- Only show matched text in a search result: When this option is enabled, FileSeek will show only the matched text in a result, instead of the entire line where the text was found.
- Wrap the text that is shown in a search result: When this option is enabled, FileSeek will show all of the text of a result without the need for a scroll bar.
- Select a default operation for double clicking on a search result: This drop down menu allows a user to select what they would like FileSeek to do with the search result if the user double clicks on it.
- Show this many characters for each search result: This option lets the user select how many characters the search result text field will be limited to showing. (Default of 100 characters, maximum of 1000 characters) (Pro Only)
- Use a custom date format: When this option is enabled, FileSeek will use the custom date format that is entered in the text field below.
- Custom Date and Time Format Strings: Clicking this link will take you to Microsoft's documentation on formatting date and time values.
- Show Preview Panel: If this option is enabled, FileSeek will show a preview of the text from the selected file in the results view.
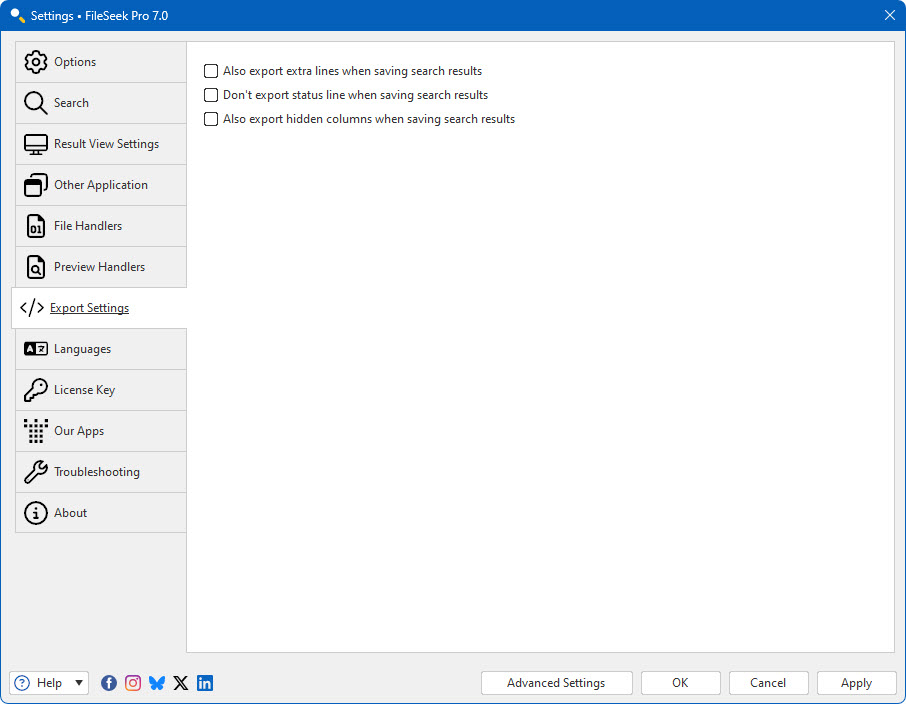
This tab in the Settings window allows you to change options that affect the output of exported search results, when exporting to HTML and CSV.
- Also export extra lines when saving search results: If this option is enabled, FileSeek will export any lines captured before and after a search result along with the matching line.
- Don't export status line when saving search results: If this option is enabled, FileSeek won't include the final status line (contains totals and summary data) in the exported HTML or CSV file.
- Also export hidden columns when saving search results: If this option is enabled, FileSeek will export all search result columns instead of only the columns that are selected on the Settings > Result View tab.
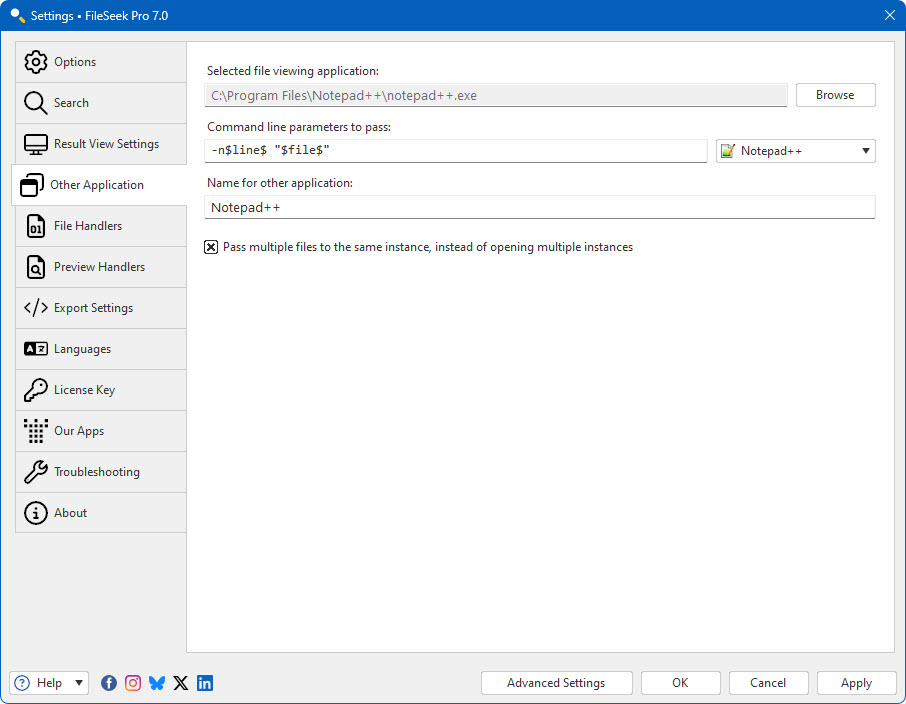
This tab in the Settings window give the user the ability to select another viewing application to open search results in.
- Selected file viewing application: This text field shows the absolute path to the other file viewing application that you have selected.
- Command line parameters to pass: In this text field you can enter the command line parameters to pass to the other application that you have chosen.
- Default: This dropdown has some standard settings for common text editing programs, as well as the option to enter custom settings. Choosing "Default" will return the command line parameters for the other application to their default values.
- Name for other application: Entering text in this text field will let you give a name for the other application that you selected.
- Pass multiple files to the same instance, instead of opening multiple instances: With this option enabled, FileSeek will try to open all of the selected files into one instance of the selected application.
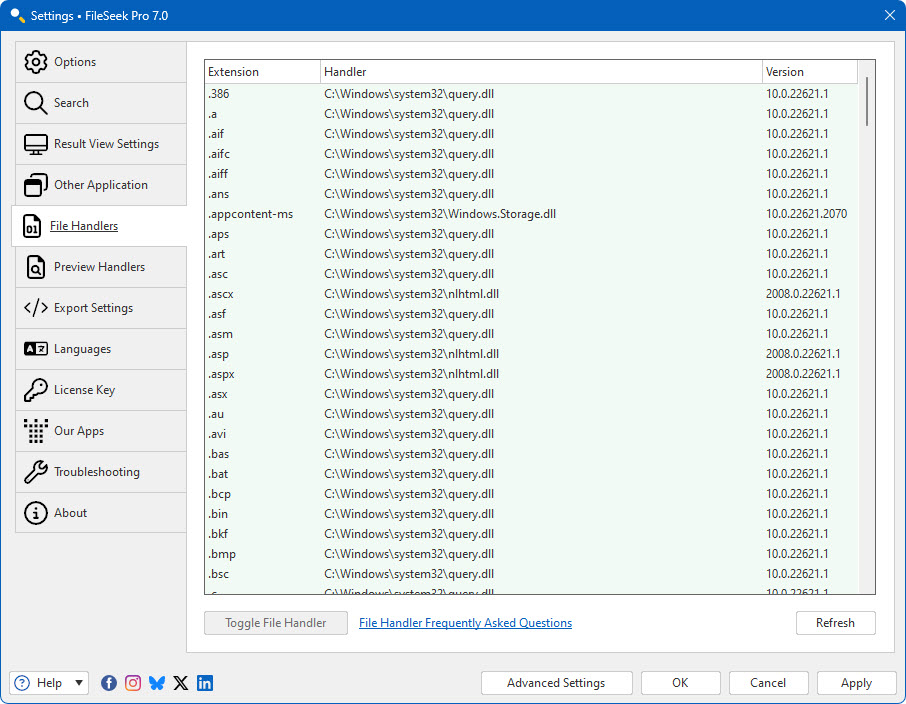
This tab shows a page of file handlers currently installed on your system, as well as controls to enable or disable certain file handlers, and refresh the list.
- Extension: This column shows the file extensions that have file handlers currently installed.
- Handler: This column shows the path to the DLL of the file handler that's used for that file type.
- Version: This column shows the version of the DLL of the file handler that's used for that file type.
- Toggle File Handler: This button will turn use of the selected file handler in FileSeek on or off.
- Refresh: Click this button to refresh the list of file handlers.
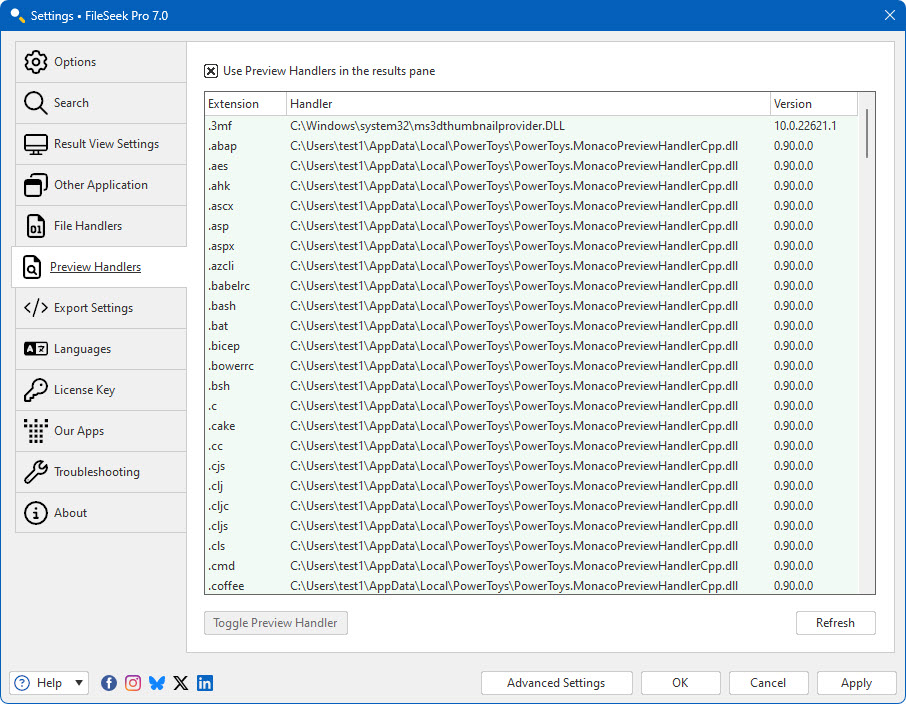
This tab shows a page of preview handlers currently installed on your system, as well as controls to enable or disable certain preview handlers, and refresh the list.
- Use Preview Handlers in the results pane: When this option is enabled, FileSeek will use preview handlers installed on your system to give you a preview of the selected file in the search results.
- Extension: This column shows the file extensions that have preview handlers currently installed.
- Handler: This column shows the path to the DLL or EXE of the preview handler that's used for that file type.
- Version: This column shows the version of the DLL or EXE of the preview handler that's used for that file type.
- Toggle Preview Handler: This button will turn use of the selected preview handler in FileSeek on or off.
- Refresh: Click this button to refresh the list of preview handlers.
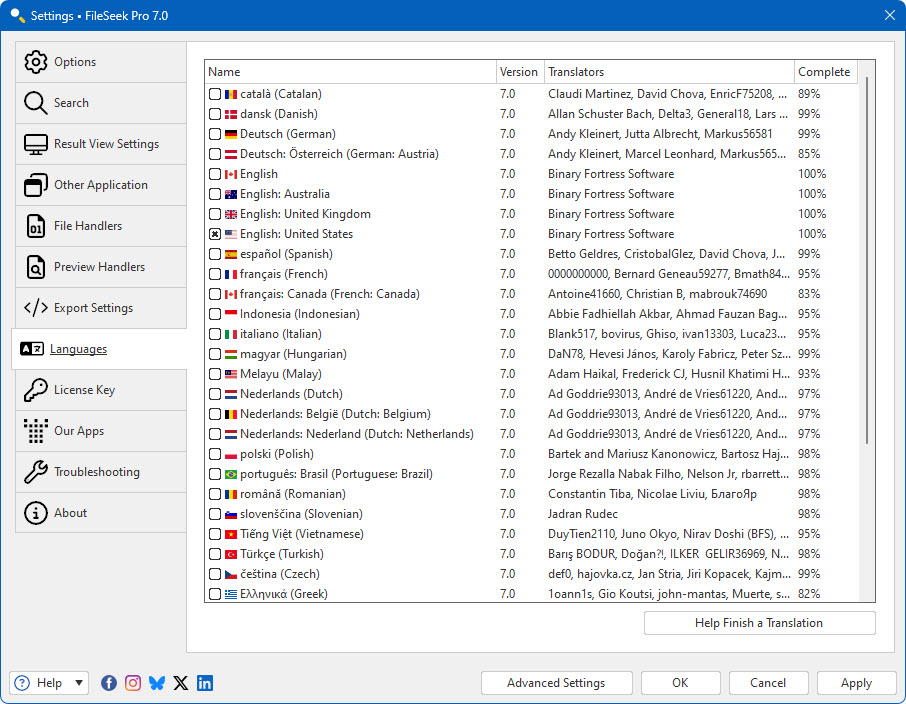
This tab in the Settings window contains a list of all the languages currently installed on your system for use.
- Name: This column shows the name of the language.
- Version: Shows the version for the Language file. This version should match the program version for best compatibility.
- Translators: Shows the contributors for the Language file.
- Complete: What percent complete the language file is.
- Help Finish a Translation: Help us finish a translation and receive a free Pro Standard license in return.
This tab in the Settings window displays your current License key, and allows you to update the License Key or revert to the free version.
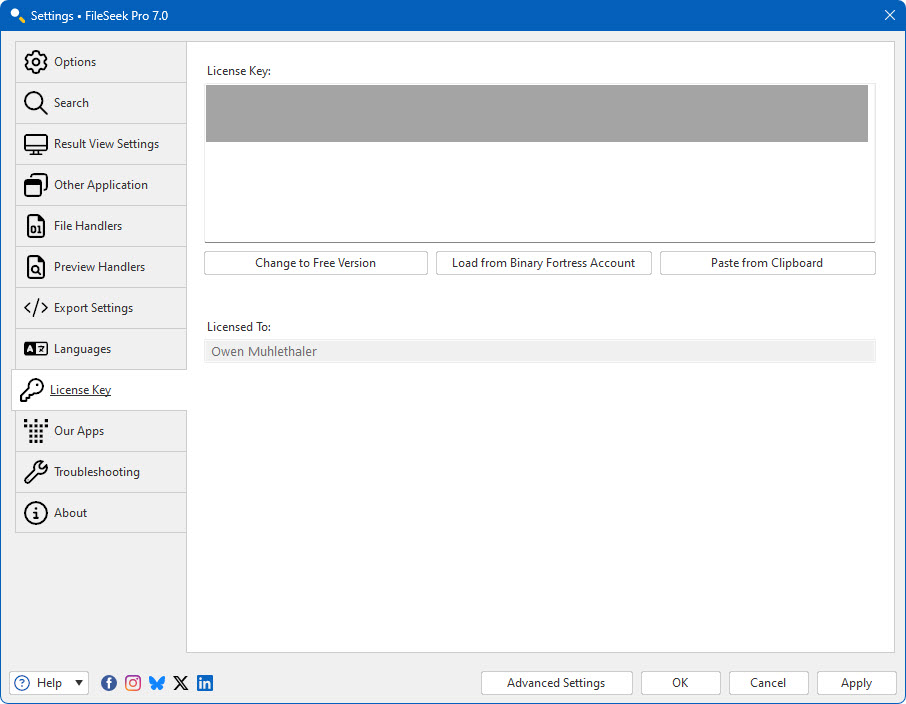
- License Key: The License Key that this application is currently using.
- Change to Free Version: At any time during the free 30-day Pro trial, you can click this button to revert back to the Free version of this application.
- Restore Trial License Key: This allows you to restore a trial license key if it was removed in error and is still valid (within 30 days).
- Load from Binary Fortress Account: Click this button to retrieve and select a license key from a list of license keys tied to your Binary Fortress account.
- Paste from Clipboard: If you have copied your license key from your email, just click this button to automatically paste it into the License Key box.
- Buy a License Key: If you're currently on the Free or Trial version, and you'd like to purchase a lifetime Pro license, click this button to be taken to the purchase page.
- Licensed To: Shows who the license key is registered to, and if it is a Site License key.
- License Expiry Date: If you are using a Trial license, this will show when it will expire.
- Request New Trial License: Click this button to submit a request to the Binary Fortress Software support team for a new 30-day trial license key.
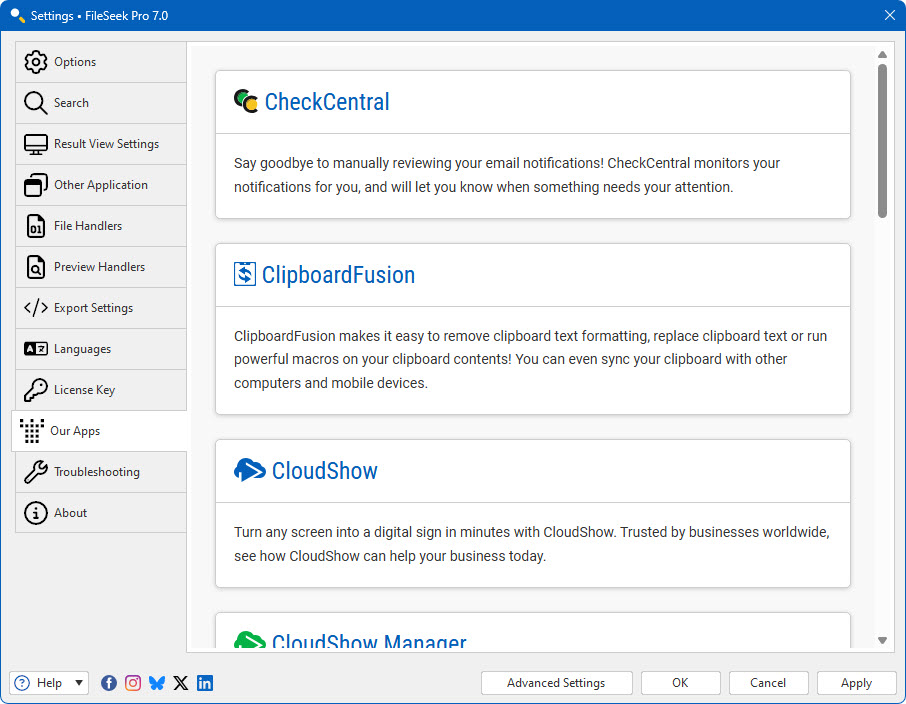
The Our Apps tab lists some of our other popular applications. If you enjoy using this application, feel free to check out our other applications as well!
The troubleshooting tab contains information and options that are only useful for troubleshooting when something isn't working correctly. The text area contains all the information required by Binary Fortress Support when submitting a help request. The button with the blue arrows allows you to refresh the information listed here.
The Logging drop-down list allows you to set the Debug Logging Level. This typically only needs to be enabled when requested by the Binary Fortress support team.
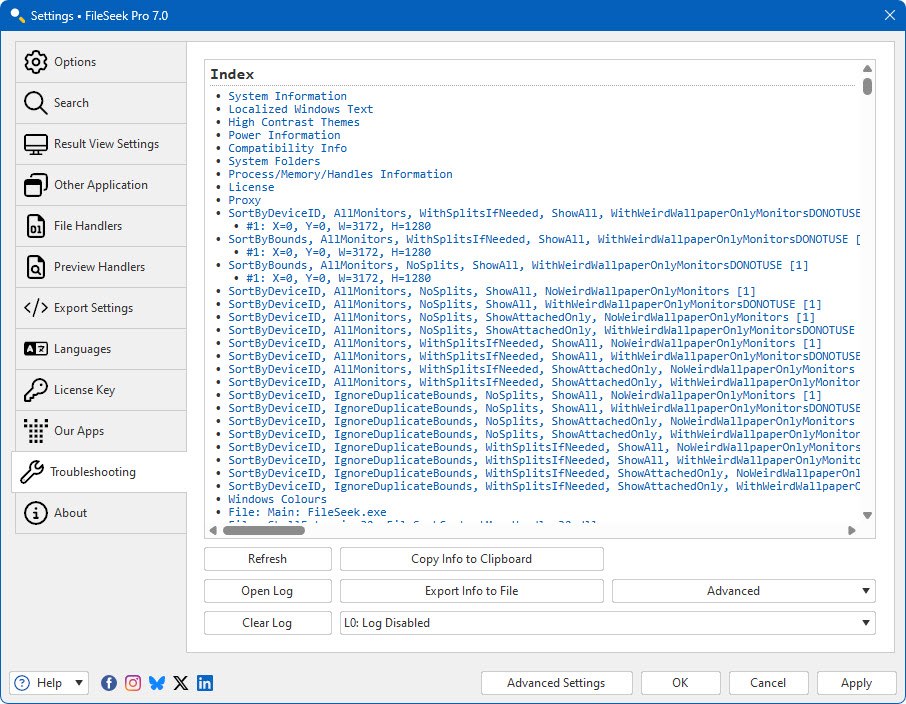
- Refresh: Click this button to refresh the troubleshooting info.
- Open Log: Opens an explorer window to the debug log file's location so you can attach it to an email, or upload it to the support forum.
- Clear Log: Clears the application debug log
- Copy Info to Clipboard: Copies the information from the text area to the clipboard – you can paste this information into an email or forum post by pressing Ctrl + V.
- Export Info to File: This will open a Save File dialog that will let you save your troubleshooting info to a file.
- Log Level: This drop-down menu allows you to choose the logging level for debug logs. L0: Log Disabled is recommended for normal usage. You'll typically only want to enable debug logging to capture a log of a reproduceable issue when submitting a support request.
- Advanced: This button opens a menu with the following options: Restart application; Force Memory Cleanup; Reset All Settings to Default; Enable Memory Profiling (for support cases only); Restart Windows Explorer.
This dialog allows you to customize to connect to the internet to search for updates or to sync settings and profiles with your Binary Fortress account. This dialog can be accessed via the Internet Connection Settings button on the Options tab.
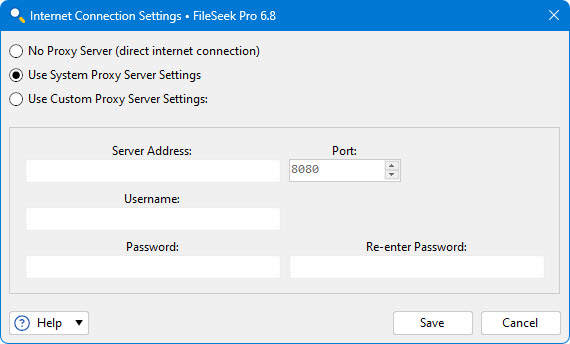
- No Proxy Server (direct internet connection): Select this option if you do not want this application to use a proxy server when accessing the Internet.
- Use System Proxy Server Settings: Select this option to have this application use the proxy settings that are configured in Internet Explorer.
- Use Custom Proxy Server Settings: Select this option if you would like to manually enter your proxy server information.
- Server Address: Enter the proxy server IP address or host name in this text box.
- Port: Enter the proxy server port in this text box.
- Username: Enter the username for your proxy server in this text box.
- Password: Enter the password for your proxy server in this text box.
- Re-enter Password: Re-enter the password (if required) for your proxy server in this text field.
- Save: Save the current proxy settings.
You can use these Advanced Settings to control hidden options. This window is accessed via the Advanced Settings button at the bottom of the main Settings window. For more information on what these settings control, please visit the
Advanced Settings guide.
- Only show modified values: Only show advanced settings that have a value assigned.
- Filter: The filter box allows you to search for advanced setting names. It uses the Binary Fortress Text Query syntax.
- Setting: Shows the category and name of the hidden setting that you can edit.
- Value: Shows the current value, and highlights the setting in red if there is a value set.
- Default Value: Restores the selected setting to its default value.
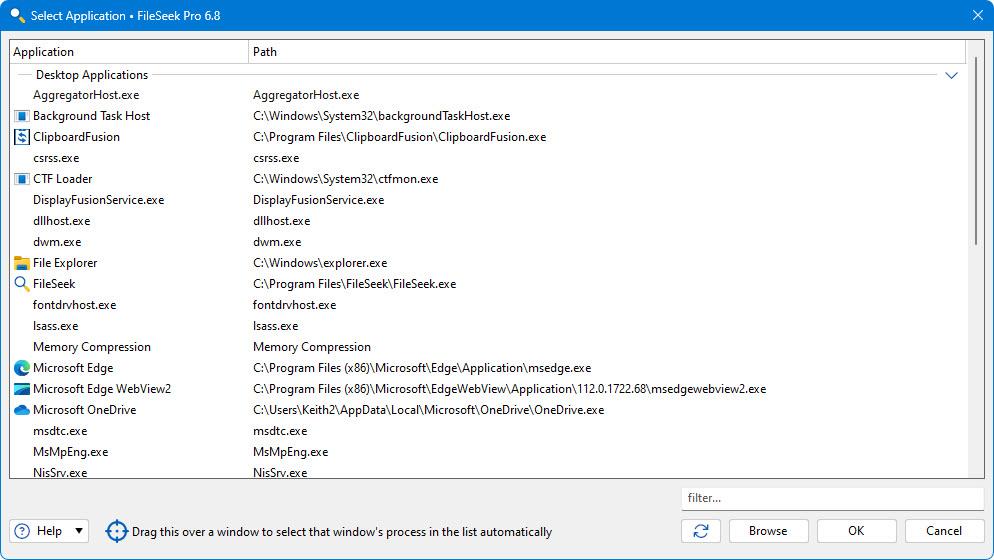
This window allows you to select from a list of currently running applications, or browse for an application on your computer. This window can be accessed via the Browse button on the Settings > Other Application tab.
- Application: Shows the application's name.
- Path: Shows the application's path.
- Filter: The filter box allows you to search for application paths. It uses the Binary Fortress Text Query syntax.
- Refresh: Click this button to refresh the list of open applications.
- Browse: Allows you to browse and select an application that isn't currently listed.
- Drag this over a window to select that window's process in the list automatically: When you drag this target icon over a window, any information about that window will be filled out automatically, like it's title, or class.
This window is displayed when a new version of the application is available.
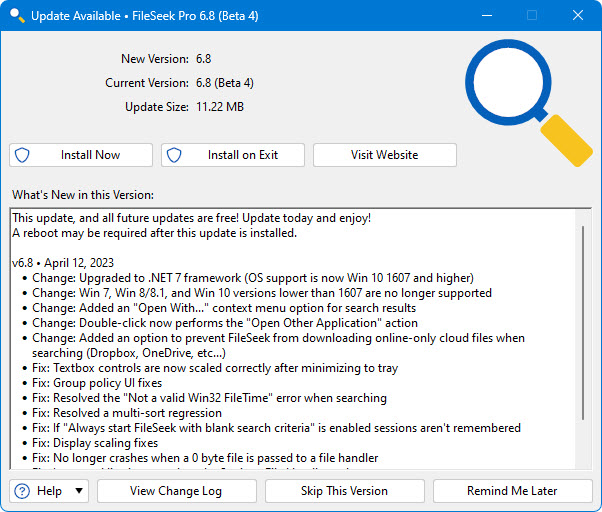
- New Version: Shows the version number of the new version, and whether or not it is a beta release.
- Current Version: Shows the version you are currently using.
- Update Size: Shows the download size of the update.
- What's New in this Version: This shows the changes that have been made to this application since the last time you installed an update. It is a helpful guide to see what new features will be available in the new version.
- Install Now: Automatically downloads and installs the update with only 1 click. (Pro only)
- Install on Exit: Automatically downloads and installs the update after you exit the program, as long as the computer isn't shutting down. (Pro only)
- Visit Website: Opens your default web browser to the application download page so you can download the latest version.
- View Change Log: Opens your default web browser and shows the Change Log. This will allow you to see what has changed since the previous version.
- Skip This Version: Closes the update window, and tells this application to never remind you about this version. Newer versions, and forcing the update check manually using the "Check Now" button will still cause the update window to appear later.
- Remind Me Later: Closes the update window, and allows this application to remind you about the update later.
This window allows you to submit a support request, along with your Troubleshooting information and debug log (if debug logging is enabled on the Troubleshooting tab in the settings window). This window can be accessed via the Help dropdown at the bottom left of the Settings window.
- Name: Enter your email address in this text box.
- Email Address: Enter your name in this text box.
- Subject: Enter a quick one line description of your issue in this text box.
- Message: Enter a message explaining the issue that you're running into. If you clicked the Support Request button on an error message window, the error text will also show in this text box.
- Attach File: This will add an attachment to your support request.
- Clear Attachments: This will clear all attachments from your support request.
- Include a settings backup with this support request: Enable this checkbox to send a backup of your product registry Settings along with the support request.